Wearable Medtech Design
This device measures and analyzes live vital signals, using 4 principle sensors, during continuous daily wear to enable the diagnosis of 20 different medical conditions for administration of preemptive care.
Role User research, conceptual design, materials research, usability engineering, low-level mechanical prototypes,
hardware testing research, ergonomics research, parts sourcing, and writing final documentation for client
When September - January 2017
Team Healthcare Human Factors team (core team of 3, extended team of 5)
Tools Fusion 360, Solidworks, Formlabs 2 SLA 3D printer, and miscellaneous prototyping materials
DESIGN OVERVIEW
The medical device in question was a product owned by our client. The product has two cooperative components: an earpiece and a collar. The entire device measures ECG, heart rate, oxygen saturation, respiration, core body temperature, blood pressure, movement, steps & posture. This device is part of an integrated healthcare station that connects to an app that enables access to patients (consumer users) and clinicians alike.
Our team was contracted to improve the design of the earpiece component, and to prepare a design ready for clinical testing. The earpiece measures oxygen saturation, core body temperature, movement and steps & posture.
Context
THE OPPORTUNITY
At this stage of the product, the client was looking for a prototype to use in clinical testing with post-operative patients. However, they had changed the signal measurement mechanism of their device, hence our team was tasked in many R&D tasks to ensure the proposed design would function. The final output was a structural skeleton and design concept ready for manufacture, of which another contractor was responsible.
PRIMARY USER
The product was meant to be for consumers and clinical professionals alike, however this is a long term product development goal. The current design was tailored for post-operative patients who had undergone a cardiac surgery. These users are considered a vulnerable population, and are generally of an older demographic with a few existing co-morbidity factors.
STAKEHOLDERS
-
Hospitals and larger healthcare/government providers
-
Clinicians who would be empowered to better engage with their patients
-
Family and caretakers
ENGINEERING & DESIGN SPECIFICATIONS OVERVIEW
With the primary stakeholder in mind, the client had a handful of predefined requirements such as:
-
Water ingress
-
IEC 60601 - 1 standards for biosafety
-
Extended (and ideally continuous) wear for up to 45 days post-surgery
-
a predefined biosignal measurement location (the cavum conchae) and mechanism (transmittance)
Other design and engineering specs were developed through the design process (as outlined in the Process section below).
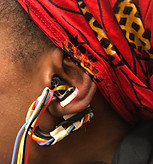
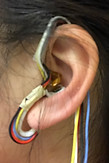
FINAL DESIGN KEY FEATURES
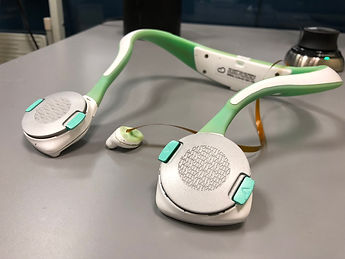
Previous iteration of the medical device. Ribbon cable connected the earpiece and collar here.

Tailored Physical Ergonomics:
-
the product dimensions are based on the structure of cavum conchae of 50-80 year old, and
-
the design was tested in human ears for comfort in order to optimize the angle and arm length that holds the thermopile in place.
Minimized Signal Noise: the cable to the collar being draped over the ear provides for optimal strain relief, and the integrated 'wing' aids in reducing in-ear PCB rotation.
Easy Manufacture: the design utilizes stock parts where possible and aims to minimize the number of different components.
Easy to Use for Low Dexterity Users: high quality market earpieces currently employ sets of varying sized ear gels to customize in-ear fit or custom sized ear-hook components, however, this requires higher dexterity, and maneuvering the resulting piece into the ear does too; the clip design necessitates a simpler pulling action without the need for any adjustment points.
Sanitation Optimized: the water-tight seal of an overmolding encasement that minimizes part lines allows the earpiece to be easily wiped down.
Process
DESIGN STAGES & DELIVERABLES
I worked with our client through an end-to-end design process. One of the challenges of being involved from the beginning was unforeseen manufacturing delay times. As a result, direct, formative user testing was tabled for a future iteration; only device performance testing was done.
STAGES OVERVIEW
Testing
Discovery
Prototyping
Final Design
Iteration!
DELIVERABLES OVERVIEW
Functional Prototype
Industrial Design Optimized for User Experience
Mechanical Form that Optimizes Sensor Signal Quality
DISCOVERY
This stage was instrumental in achieving the following goals:
-
understanding the needs of our primary user
-
understanding current competition and existing reference designs (with regards to both form, possible components, and possible mechanisms)
-
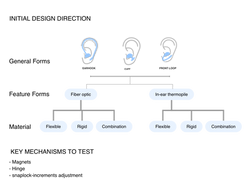
divergent design conceptualization
-
identifying major risks & challenges
Below is a collection of artifacts from this phase (click to enlarge any image):
 |  |  |
|---|---|---|
 |  |  |
 |  |  |
 |  |  |
 |  |
It was also during this time that I designed a usability engineering formative testing protocol. Initially, a 2-day remote study was conceptualized because the wearable device is meant for long-term wear. The protocol I researched a developed would have been the first remotely simulated testing done with the organization. However, project timeline restrictions downstream necessitated that the testing be limited to 3 hours. The following graphic outlines stages of the testing protocol meant to be done in 3 hours in a simulation lab. Following, there are some artifacts of the testing materials that were meant to be employed with real human users in the simulations.
 |
|---|
 |  |  |
|---|---|---|
 |
In this stage the goals were achieved with the following insights:
-
understanding the needs of our primary user: minimal sound occlusion and maximal comfort during sleep (research document here)
-
understanding current competition and existing reference designs (with regards to both form, possible components, and possible mechanisms): there is nothing else on the market that uses the mechanism our client chose for SPO2 measurement during continuous wear/active motion
-
divergent design conceptualization: the most promising design is an over- the-ear hook with multiple sized ear gels
-
identifying major risks & challenges: obtaining an accurate SPO2 signal during movement, and obtaining the needed medical grade materials for fabrication
PROTOTYPING
This stage was instrumental in achieving the following goals:
-
understanding the feasibility of my designs with supported guerrilla testing
-
convergent design conceptualization
-
identifying major risks & challenges in usability and manufacturing
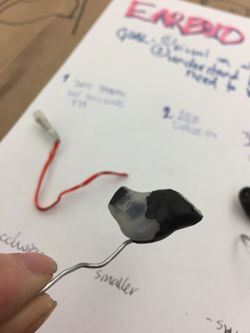
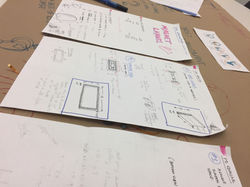
Below is a collection of artifacts from this phase:
 |  |  |
|---|---|---|
 |  |  |
 |  |  |
 |  |  |
 |  |  |
 |  |  |
 |  |  |
 |  |  |
 |  |  |
 |  |  |
 |  |  |
 |  |  |
 |  |  |
 |  |  |
In this stage the goals were achieved with the following insights:
-
understanding the feasibility of my designs:
-
magnets cannot be used because magnetic sensor alignment for sufficient signal quality requires a magnetic field that poses health risks to users with pace makers;
-
over-the-ear mechanical adjustment (i.e. notches, slide tracks, or loops) interfere with glasses too much and require too much finger dexterity for easy donning by target user
-
convergent design conceptualization:
-
the use of a mechanical clip design is most likely to best align the sensors
-
identifying major risks & challenges in usability and manufacturing:
-
the ease of donning using mechanical clip force was highly dependent on the angle between the in-ear and out-of-ear components, and the molding's elastic malleability;
-
comfort during long term wear and ease of donning can only be further tested by prototyping directly with the overmolds of custom silicone molding material compliant with wearable & medical design standards IEC 60601-1;
-
Finding fabrication techniques and small batch manufacturers to fit the project timeline will be challenging;
-
a fitting service may need to be considered for the product because human ear anthropometrics are considerably variable such that mechanical alignment of sensors may cause decreased biometric reading accuracy
TESTING
This stage was instrumental in achieving the following goals:
-
validate the optimal target location for sensor placement
-
validate which design best facilitates quality biosensor data collection when used (worn on a human while they are doing daily activities), and pinpoint biosensor algorithm variables that greatly effect reading accuracy
Below is a collection of artifacts from this phase.
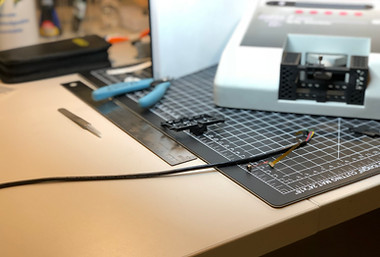
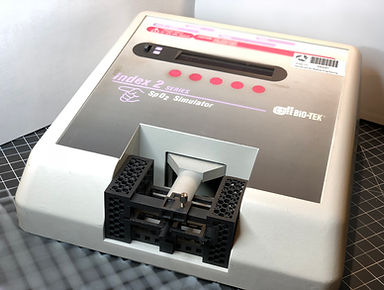
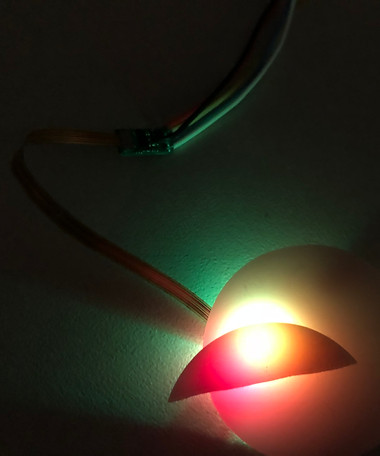
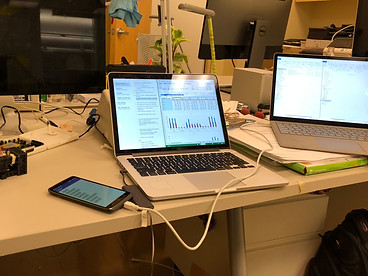
Qualitative testing was conducted in parallel with prototyping. However, the allure of the ease of donning enabled through magnetic sensor alignment was too great to be left at qualitative testing. Upon conceptualizing the magnetic alignment mechanism, a test rig for quantitative testing was designed to understand how variances in the shape of the ear effect the SPO2 sensor's light path (and ultimate signal quality). I designed the rig to simulate the variances in the shape of the ear by controlling the amount of misalignment between the two sensor boards in 2 degrees of freedom.


In this stage the goals were achieved by providing insight or numbers for the following research questions (full results are not shared due to confidentiality):
-
validate the optimal target location for sensor placement:
-
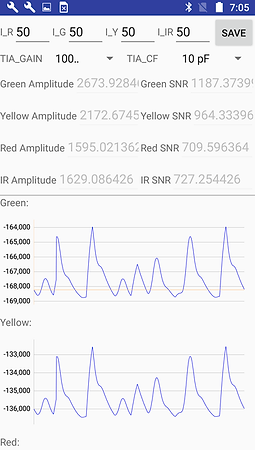
what are the minimum & optimal LED settings for testing?
- what is the maximum allowable planar misalignment, tilt angle and board separation distance?
- what angle can be expected and how does it affect signal quality?
-
validate which design best facilitates quality biosensor data collection when used (worn on a human while they are doing daily activities), and pinpoint biosensor algorithm variables that greatly effect reading accuracy: upon discovering that the prototype boards were relatively fragile and unstable, the following was asked:
-
what are the best tools for testing?
-
what are additional biological considerations (i.e. effect on algorithm analysis given a co-morbidity like tachycardia)?
A minimum of 50 trials were run for each research question. Microsoft Excel was the tool of choice.
FINAL DESIGN
With extensive back and forth with one client representative throughout the project, the need for efficient knowledge dissemination to their extended team was identified. This was facilitated with a reading slide deck to complement a series of detailed testing data spreadsheets as hand-off documentation.
My Role
TECHNICAL WORK
DISCOVERY
-
journey mapping and touch-point analysis
-
usability testing protocol development using pairwise comparison analysis
-
support in materials research and vendor liaison for parts procurement,
-
research feasibility of fiber optic technology
-
mood board development for conceptual design research using InVision
-
ergonomic research via anthropometric data analysis to inform redesign of wearable ECG for collaborating contractors and client
-
facilitating ideation sessions with teammates
PROTOTYPING
-
I was 1 of 3 contributors to design ideas for prototyping; owner of the 0% occlusion design and magnetic sensor alignment feasibility testing
-
exploration of 8+ ear gel shapes and prototypes
-
dissection of products on the market and reverse engineering existing products for prototyping
-
support in developing best thermopile (temperature measurement component) configuration (5+ prototypes where angle and shape of section varied)
-
owner of prototyping documentation to inform progress and strategy of development process (used Sketch to create tracking tools)
-
trusted with my own design 3D prints and created CAD files using Fusion360 and Solidworks
TESTING
I owned the testing phase of the design process from start to finish (i.e. testing procedure design, data analysis, and reporting). I was the primary contact for client communications regarding design testing.
FINAL DESIGN
I authored the entirety of the hand-off documentation with the exception of the CAD files.
MY TEAM
This was my first project of my internship, and so my role was originally intended to be support for a usability engineer on our team. However, evolving with the fast changing demands on our client's side and my strong expressed interest in product design, I identified opportunities to be involved across all aspects of the project. After 1 month of mentorship from my usability engineer colleague, he was also no longer involved in the project and I filled the role. My two other colleagues were designers with backgrounds in industrial design.
My greatest pleasure was being trusted by my team and manager to execute on many responsibilities independently in short amount of time. This experience was unique as it gave me the chance to work with industrial designers and UX focused specialists in the medical field. As a mechanical engineering student, I found myself acting as a bridge between the human factors design and electro-mechanical performance design.
LEARNINGS
There were many, but some key challenges and future aspirations from this work include:
-
increasing exposure to small scale manufacturing tools (e.g. dental molding or small scale manufacturing resources) to optimize rapid soft material prototyping processes
-
prototyping efforts can become circular without frequent visual communication of prototyping direction, and this communication resource should be collaborative
-
becoming more familiar with more medical case research and analysis resources to mitigate little to no existing research due to device's niche and novel mechanism (e.g. design with anthropometric data for 2-lead ECGs)
SKILL HIGHLIGHTS
-
Device & hardware evaluation design: creating protocols by finding industry standard benchmarking tools; using a statistically significant trial size; PPG signal analysis to identify trends and predict appropriate thresholds using Excel
-
Ideation facilitation: using journey map touch-point analysis to surface divergent ideas; using Inverse-Problem method; communication of brainstorming results to team at large
-
Prototype design documentation and strategy: identified the need to document prototyping direction and logic and created a collaborative tool and visual template to do so; aids company capacity to document work and facilitate detailed knowledge transfer
-
Design for 3D printing: design for minimal print resource use and use-specific component properties (i.e. manipulate grain direction to increase of decrease flexibility in the desired direction)
-
Client management proficiency: responsible for fragile client prototype material and for fielding questions during client meetings